Supine Yoga Postures: How to Practice, Benefits, and Precautions

Introduction

Satheesan.vnCC BY-SA 3.0,
 via Wikimedia Commons
Supine yoga postures—those performed while lying on the back—are an essential part of a well-rounded yoga practice. They range from deeply restorative poses to dynamic stretches that engage the core, open the hips, and support spinal health. 

Because they are practiced with the back supported by the floor, supine postures often feel safe and accessible for beginners while still offering challenge and depth for advanced practitioners.

These poses are especially helpful for releasing tension, calming the nervous system, and providing gentle yet effective stretches. They also encourage mindful breathing, as the open chest position in many supine postures makes deep diaphragmatic breathing more natural.

In this guide, we’ll explore the benefits, safety precautions, and step-by-step instructions for 10 essential supine yoga poses. Each pose will be described in detail with benefits and precautions so you can practice safely and confidently, whether you’re seeking relaxation, flexibility, or therapeutic relief.

Satheesan.vnCC BY-SA 3.0,
 via Wikimedia Commons

General Benefits of Supine Yoga Postures

  1. Promotes Relaxation: Grounding the body on the mat encourages calm and stress relief.

  2. Improves Flexibility: Stretches hamstrings, hips, shoulders, and spine.

  3. Strengthens Core and Back Muscles: Many supine poses build abdominal strength.

  4. Enhances Breathing: Open chest position supports deeper lung capacity.

  5. Supports Circulation and Digestion: Gentle twists and stretches stimulate organs.

  6. Accessible to Most Practitioners: Safe for beginners and useful for rehabilitation.

Precautions for Supine Yoga Postures

  • Avoid holding the breath—steady, relaxed breathing is key.

  • Use props (blankets, bolsters, blocks) for comfort and to reduce strain.

  • People with recent surgeries, spinal issues, pregnancy (for some poses), or uncontrolled high blood pressure should consult a professional.

  • Never force the body deeper into a stretch; supine postures are most beneficial when practiced with ease and awareness.

Supine Yoga Postures in Detail

Matsyendrasana
Joseph RENGERCC BY-SA 3.0,
Wikimedia Commons
1. Supine Spinal Twist (Supta Matsyendrasana)

How to Do It:

  1. Lie flat on your back with legs extended.

  2. Draw the right knee toward the chest, then guide it across the body to the left.

  3. Extend your right arm out to the side, palm up, and gaze toward it.

  4. Keep both shoulders grounded as the spine twists.

  5. Hold 30–60 seconds per side, breathing deeply.

Benefits:

  • Releases tension in the spine and lower back.

  • Massages abdominal organs, improving digestion.

  • Stretches shoulders, chest, and hips.

  • Calms the nervous system and reduces stress.

Precautions:

  • Avoid forcing the knee down if shoulders lift off the floor.

  • Support the bent knee with a block or cushion if hips are tight.

  • People with spinal injuries should practice under guidance.


Biswarup GangulyCC BY 3.0,
via Wikimedia Commons
Bridge pose, 
sometimes called
Setubandhasana

2. Bridge Pose (Setu Bandha Sarvangasana)

How to Do It:

  1. Lie on your back, knees bent, feet hip-width apart.

  2. Place arms alongside body, palms down.

  3. Inhale, press into feet to lift hips upward.

  4. Option: Interlace fingers beneath body and roll shoulders under.

  5. Hold for 30–60 seconds, then lower down slowly.

Benefits:

  • Strengthens glutes, hamstrings, and back.

  • Opens chest and lungs, improving breathing.

  • Stimulates thyroid and abdominal organs.

  • Calms the brain and reduces anxiety.

Precautions:

  • Avoid if you have severe neck or spinal injuries.

  • Keep knees aligned with hips to protect joints.

  • Support the lower back with a block for a restorative variation.

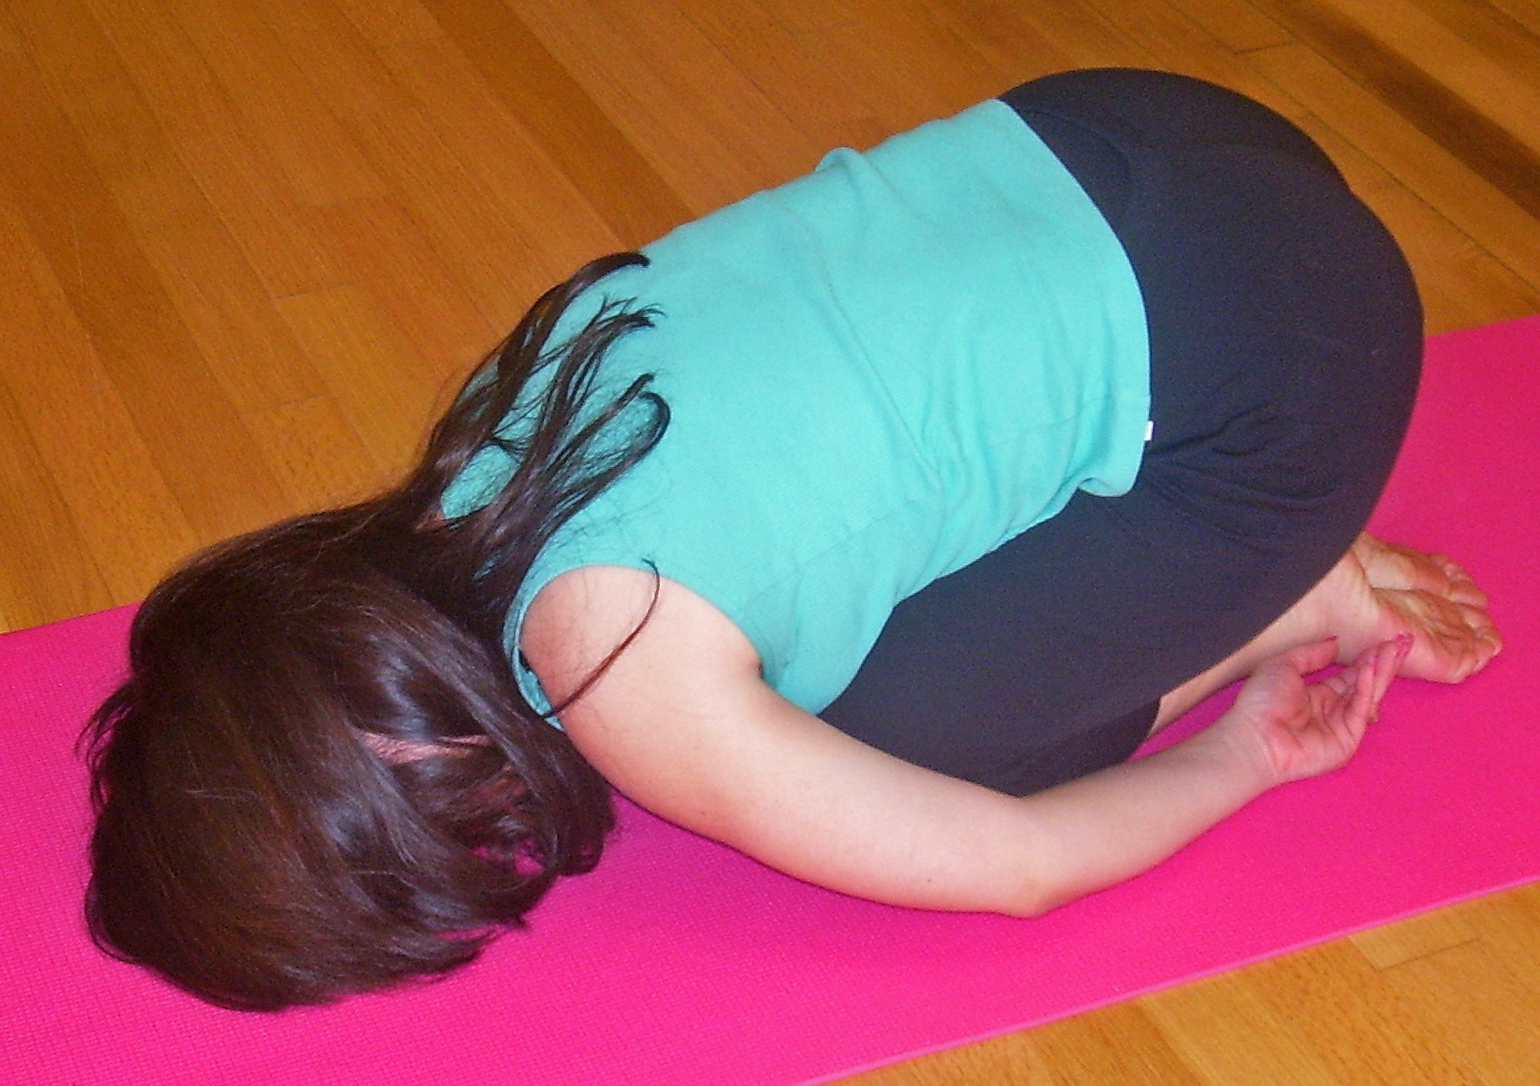
Hath Yoga Child Pose
​English Wikipedia user Daniel Case
CC BY-SA 3.0, via Wikimedia Commons
3. Happy Baby Pose (Ananda Balasana)

How to Do It:

  1. Lie on your back and draw your knees toward your chest.

  2. Hold the outsides of the feet (or shins if necessary).

  3. Gently pull knees toward armpits, keeping ankles over knees.

  4. Rock gently side to side if comfortable.

  5. Hold for 30–60 seconds.

Benefits:

  • Opens hips and stretches inner thighs.

  • Relieves tension in the lower back.

  • Calms the mind and reduces fatigue.

  • Encourages playful, stress-free energy.

Precautions:

  • Avoid if you have knee injuries.

  • Use a strap around feet if reaching them is difficult.


Nicholas A. Tonelli from Northeast Pennsylvania, USA,
 
CC BY 2.0, via Wikimedia Commons
4. Reclining Bound Angle Pose (Supta Baddha Konasana)

How to Do It:

  1. Lie on your back with knees bent.

  2. Bring soles of feet together, letting knees fall apart.

  3. Place hands on belly or extend arms outward.

  4. Stay 1–3 minutes, breathing deeply.

Benefits:

  • Opens hips and groin.

  • Relieves stress and anxiety.

  • Stimulates abdominal organs.

  • Supports relaxation and meditation.

Precautions:

  • Support knees with blocks or cushions if hips feel strained.

  • Avoid if you have hip or groin injuries.


Satheesan.vnCC BY-SA 3.0, via Wikimedia Commons

5. Reclining Hand-to-Big-Toe Pose (Supta Padangusthasana)

How to Do It:

  1. Lie on your back, legs extended.

  2. Loop a strap around the right foot and extend leg upward.

  3. Keep the left leg grounded.

  4. Hold for 30–60 seconds, then switch sides.

Benefits:

  • Stretches hamstrings and calves.

  • Improves flexibility and circulation.

  • Relieves lower back stiffness.

  • Enhances focus and balance.

Precautions:

  • Keep shoulders and head relaxed on the floor.

  • Avoid straining to straighten the leg—bend the knee slightly if needed.

Pigeon Pose
Barry SilverCC BY 2.0,
via Wikimedia Commons
6. Reclined Pigeon Pose (Supta Kapotasana / Figure Four Stretch)

How to Do It:

  1. Lie on back, bend knees, feet on mat.

  2. Cross right ankle over left thigh (figure four shape).

  3. Draw the left knee toward the chest, interlacing hands behind the thigh.

  4. Hold 30–60 seconds per side.

Benefits:

  • Opens hips and glutes.

  • Relieves sciatic nerve tension.

  • Stretches lower back.

  • Encourages relaxation.

Precautions:

  • Avoid if you have had recent hip or knee surgery.

  • Keep the ankle flexed to protect the knee joint.

Garudasana
Drchirag patel
CC BY-SA 3.0, via 
 Wikimedia Commons
7. Reclined Twist with Eagle Legs (Supta Garudasana Twist)

How to Do It:

  1. Lie on your back, bend your knees.

  2. Cross right thigh over left (eagle legs).

  3. Drop legs to the left while keeping shoulders grounded.

  4. Gaze to the right, breathing deeply.

  5. Hold 30–60 seconds per side.

Benefits:

  • Deep spinal twist releasing back tension.

  • Stretches outer hips and shoulders.

  • Calms the mind and relieves fatigue.

Precautions:

  • Avoid if you have serious spinal injuries.

  • Place a blanket between knees if joints feel strained.


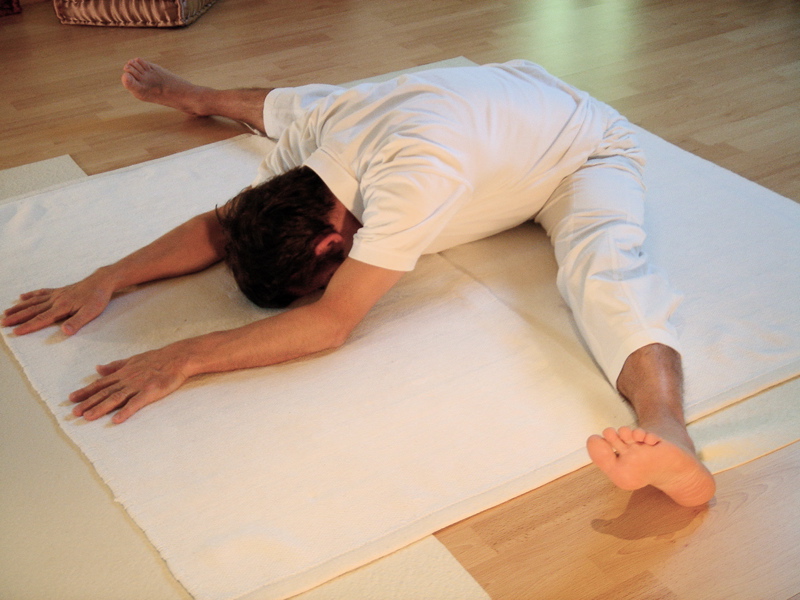
Flora-Victoria, CC0, via Wikimedia Commons
Hatha Yoga, Pawanmuktasana

8. Supine Wind-Relieving Pose (Pavanamuktasana)

How to Do It:

  1. Lie on your back, and bend your knees toward your chest.

  2. Hug both knees with arms.

  3. Option: Hug one knee at a time for the half variation.

  4. Hold for 30–60 seconds.

Benefits:

  • Relieves gas and improves digestion.

  • Stretches lower back and hips.

  • Calms the nervous system.

  • Gentle release before relaxation.

Precautions:

  • Avoid if you have had recent abdominal surgery.

  • Practice gently if you have knee issues.


Biswarup GangulyCC BY 3.0,
via Wikimedia Commons
Bridge pose, 
sometimes called
Setubandhasana

9. Supported Shoulder Bridge (Restorative Variation)

How to Do It:

  1. Lie on your back, bend your knees, and keep your feet hip-width apart.

  2. Lift hips slightly and place block under sacrum.

  3. Rest pelvis on block, arms relaxed.

  4. Stay 1–3 minutes.

Benefits:

  • Restorative version of Bridge Pose.

  • Relieves fatigue and stress.

  • Opens chest and hips gently.

  • Encourages circulation.

Precautions:

  • Ensure the block supports the sacrum, not the lower back.

  • Avoid if the block feels unstable.


Joseph RENGERCC BY-SA 3.0, via Wikimedia Commons
Shavasana—Corpse Pose

10. Corpse Pose (Savasana)

How to Do It:

  1. Lie flat on your back, legs extended comfortably apart.

  2. Arms at sides, palms facing up.

  3. Close your eyes, breathe naturally, and release tension.

  4. Stay 5–10 minutes or longer.

Benefits:

  • Ultimate relaxation and integration posture.

  • Calms the mind and reduces stress and anxiety.

  • Lowers blood pressure and heart rate.

  • Helps the body absorb the benefits of yoga practice.

Precautions:

  • Use a bolster under knees if lower back feels strained.

  • Place a blanket for warmth if needed.

Conclusion

Supine yoga postures offer a perfect balance of relaxation, flexibility, and therapeutic benefits. Because they are practiced lying on the back, they provide stability and comfort, making them accessible to practitioners of all levels. From energizing core work to deeply restorative stretches, supine poses strengthen the body, calm the mind, and support overall well-being.

The key to reaping the full benefits is mindful practice—listening to your body, using props when needed, and never pushing into discomfort. Whether you choose the grounding stillness of Savasana, the digestive support of Wind-Relieving Pose, or the hip-opening benefits of Reclined Pigeon, supine yoga postures can become a cornerstone of your practice.

By integrating them regularly into your routine, you’ll experience not only physical flexibility and strength but also greater inner peace and relaxation. Supine yoga reminds us that sometimes the most profound transformation comes from simply lying back, breathing deeply, and allowing the body and mind to restore balance. 

Forward Bend Yoga Postures: How to Do, Benefits, , and Precautions

Introduction


Joseph RENGERCC BY-SA 3.0,
via Wikimedia Commons

Forward bend yoga postures, also called forward folds, are among the most grounding and calming poses in yoga. 

Unlike backbends, which energize and expand the front body, forward bends encourage introspection, release tension, and create length along the back of the body. 

They involve flexing the spine forward, hinging at the hips, and often folding the torso over the legs.

These poses may seem simple at first glance—after all, most people remember “touching their toes” in gym class—but in yoga, forward bends go far beyond a stretch. They integrate mindful breathing, spinal elongation, and a balance of effort and relaxation. 

While they are excellent for releasing tight hamstrings and calming the nervous system, forward folds also require careful attention to alignment to avoid overstretching the lower back.

The benefits of forward bend postures extend across physical, mental, and energetic dimensions. Physically, they stretch the hamstrings, calves, hips, and spine. Mentally, they quiet the mind, reduce stress, and promote focus. Energetically, they are said to encourage turning inward and fostering introspection, making them powerful for meditation and self-reflection.

In this guide, we will explore the key benefits and safety precautions of forward bends, followed by detailed instructions, benefits, and modifications for fourteen essential forward-bending postures. Whether you are a beginner seeking gentle hamstring stretches or an advanced yogi exploring deep hip folds, these poses will support your practice of balance, calm, and inner awareness.

Joseph RENGERCC BY-SA 3.0,
via Wikimedia Commons

General Benefits of Forward Bend Yoga

  1. Stretches the Back Body: Lengthens hamstrings, calves, hips, and spine.

  2. Relieves Tension: Eases stiffness from prolonged sitting or standing.

  3. Calms the Nervous System: Encourages relaxation, reduces stress, and improves sleep.

  4. Improves Flexibility: Gradually increases mobility in legs and hips.

  5. Supports Digestion: Gentle compression stimulates abdominal organs.

  6. Promotes Circulation: Forward folds enhance blood flow to the brain.

  7. Encourages Mindfulness: These introspective postures promote grounding and focus.

Precautions for Forward Bend Yoga

  • Always hinge at the hips, not the waist, to protect the lower back.

  • Keep a slight bend in the knees if hamstrings are tight.

  • Avoid forcing your body deeper—focus on elongation, not collapse.

  • Contraindications include severe lower back pain, sciatica, herniated discs, pregnancy (deep-seated folds), and recent abdominal surgery.

  • Use props like blocks, straps, and bolsters for support.

  • Balance with gentle backbends or neutral postures after prolonged forward folding.

Forward Bend Yoga Postures in Detail


Joseph RENGER
CC BY-SA 3.0, via
 Wikimedia Commons
Uttasana

1. Standing Forward Bend (Uttanasana)

How to Do It:

  1. Stand tall with feet hip-width apart.

  2. Inhale to lengthen the spine, then exhale to hinge at the hips and fold forward.

  3. Allow the crown of the head to release toward the floor.

  4. Keep knees slightly bent if hamstrings are tight.

  5. Hold for 30–60 seconds, breathing deeply.

Benefits:

  • Stretches hamstrings, calves, and back.

  • Relieves tension in the spine and neck.

  • Improves circulation to the brain, refreshing the mind.

  • Calms stress and anxiety.

Precautions:

  • Avoid locking knees—micro-bend legs if necessary.

  • People with low blood pressure should come out slowly.

  • Support hands on blocks if reaching the floor is uncomfortable.


Joseph RENGERCC BY-SA 3.0,
via Wikimedia Commons

2. Seated Forward Bend (Paschimottanasana)

How to Do It:

  1. Sit with legs extended in front.

  2. Inhale, lengthen spine upward.

  3. Exhale, hinge forward from hips, reaching hands toward feet.

  4. Rest torso over thighs or shins.

  5. Hold for 1–2 minutes with steady breathing.

Benefits:

  • Deep stretch for hamstrings and spine.

  • Stimulates kidneys, liver, and digestive organs.

  • Reduces stress and calms the mind.

  • Enhances focus and introspection.

Precautions:

  • Avoid rounding your lower back—use a strap if you can’t reach your feet.

  • Not suitable for severe lower back injuries.

Nicholas A. Tonelli from Northeast Pennsylvania,
 USA
CC BY 2.0, via Wikimedia Commons

3. Wide-Legged Standing Forward Bend (Prasarita Padottanasana)

How to Do It:

  1. Stand with legs wide apart.

  2. Place hands on hips, inhale to lengthen spine.

  3. Exhale, fold forward, placing hands on the floor or blocks.

  4. Option: Rest crown of head on mat.

  5. Hold for 30–60 seconds.

Benefits:

  • Stretches hamstrings, calves, inner thighs, and spine.

  • Improves balance and circulation.

  • Calms the nervous system.

  • Strengthens legs while providing a deep stretch.

Precautions:

  • Avoid collapsing shoulders or straining your neck.

  • Use blocks for hands if the floor feels far away.

LYUvivekkarangiya, CC0,
via Wikimedia Commons

4. Head-to-Knee Pose (Janu Sirsasana)

How to Do It:

  1. Sit with both legs extended.

  2. Bend the right knee, placing the foot against the inner left thigh.

  3. Inhale to lengthen the spine, exhale to fold over the straight leg.

  4. Hold for 1–2 minutes, switch sides.

Benefits:

  • Stretches hamstrings and groin.

  • Massages abdominal organs and aids digestion.

  • Calms stress and anxiety.

  • Improves concentration.

Precautions:

  • Keep spine long—avoid rounding excessively.

  • Use a strap around foot if flexibility is limited.


Joseph RENGERCC BY-SA 3.0,
via Wikimedia Commons
5. Intense Side Stretch (Parsvottanasana)

How to Do It:

  1. Step into a lunge stance with feet about 3 feet apart.

  2. Square hips forward.

  3. Inhale to lengthen spine, exhale to fold over front leg.

  4. Hands can rest on shin, floor, or blocks.

  5. Hold 30–60 seconds, then switch sides.

Benefits:

  • Deep hamstring stretch.

  • Strengthens legs while improving balance.

  • Calms the mind and relieves stress.

  • Improves posture.

Precautions:

  • Avoid collapsing chest over thigh—keep spine long.

  • Modify with bent front knee if hamstrings are tight.

6. Pyramid Pose Variation (Ardha Parsvottanasana)

How to Do It:

  1. Begin in a shorter lunge stance.

  2. Straighten front leg while keeping hips squared.

  3. Hinge forward with long spine, hands on blocks if needed.

  4. Hold 30–60 seconds per side.

Benefits:

  • Gentle hamstring stretch.

  • Strengthens core and improves alignment.

  • Encourages balance and stability.

Precautions:

  • Avoid overstretching hamstrings.

  • Use props for support if needed.


JfbongarçonCC BY-SA 3.0,
via Wikimedia Commons
7. Bound Angle Forward Bend (Baddha Konasana Forward Fold)

How to Do It:

  1. Sit with soles of feet together, knees dropping to sides.

  2. Hold feet with hands, inhale to lift spine.

  3. Exhale, hinge forward, bringing chest toward feet.

  4. Hold 1–2 minutes.

Benefits:

  • Opens hips and groin.

  • Stimulates abdominal organs.

  • Calms nervous system and reduces fatigue.

Precautions:

  • Support knees with blocks if hips are tight.

  • Avoid forcing knees down.

Nicholas A. Tonelli from Pennsylvania, USA,
 
CC BY 2.0, via Wikimedia Commons
Half-bound lotus forward bend

8. Half Bound Lotus Forward Bend (Ardha Baddha Padma Paschimottanasana)

How to Do It:

  1. Sit with one leg extended.

  2. Bring opposite foot into half lotus.

  3. Inhale, lengthen spine, exhale fold over extended leg.

  4. Hold 30–60 seconds, then switch.

Benefits:

  • Deep stretch for hamstrings and hips.

  • Improves hip mobility.

  • Enhances concentration and focus.

Precautions:

  • Avoid if you have knee issues.

  • Modify with half cross-legged position.


UmaPrykhodkoCC BY-SA 4.0,
 via Wikimedia Commons

9. Child’s Pose (Balasana – Forward Fold Variation)

How to Do It:

  1. Kneel on mat with toes together, knees apart.

  2. Fold torso forward, arms extended or resting by sides.

  3. Rest forehead on mat, breathing deeply.

Benefits:

  • Gentle forward fold for relaxation.

  • Stretches spine, hips, and thighs.

  • Calms the mind and relieves fatigue.

Precautions:

  • Avoid if you have knee injuries.

  • Support torso with bolster for comfort.


Satheesan.vnCC BY-SA 3.0, via Wikimedia Commons
10. Reclined Big Toe Pose (Supta Padangusthasana – Forward Fold Variation)

How to Do It:

  1. Lie on back, extend one leg upward.

  2. Use strap around foot to hold leg straight.

  3. Keep opposite leg grounded.

  4. Hold 30–60 seconds each side.

Benefits:

  • Deep hamstring stretch.

  • Improves flexibility and circulation.

  • Calms stress while lying down.

Precautions:

  • Keep head and shoulders relaxed.

  • Avoid jerking leg to go deeper.


Roberto Busconi at Yoga Mon AmourCC BY-SA 4.0,
via Wikimedia Commons
Uttanasana    -   Standing Forward Bend

11. Forward Fold with Shoulder Stretch (Uttanasana Variation)

How to Do It:

  1. Stand in forward bend.

  2. Interlace fingers behind back.

  3. Let arms extend overhead as you fold deeper.

Benefits:

  • Stretches hamstrings and shoulders simultaneously.

  • Improves posture.

  • Releases stress and tension.

Precautions:

  • Keep knees bent if hamstrings are tight.

  • Avoid if you have shoulder injuries.

Joseph RENGERCC BY-SA 3.0,
via Wikimedia Commons

12. Wide-Angle Seated Forward Bend (Upavistha Konasana)

How to Do It:

  1. Sit with legs spread wide.

  2. Place hands on floor in front.

  3. Inhale lengthen spine, exhale fold forward.

  4. Hold 1–2 minutes.

Benefits:

  • Stretches hamstrings, inner thighs, and hips.

  • Stimulates abdominal organs.

  • Calms mind and relieves fatigue.

Precautions:

  • Avoid rounding spine excessively.

  • Support hips with blanket if lower back feels strained.

13. Standing Forward Fold with Wide Legs and Twist

How to Do It:

  1. From wide-legged forward bend, place right hand on floor.

  2. Inhale left arm upward, twisting spine.

  3. Hold 30 seconds, then switch sides.

Benefits:

  • Combines hamstring stretch with spinal twist.

  • Improves digestion.

  • Relieves stress and tension.

Precautions:

  • Keep spine long, avoid collapsing chest.

  • Modify with hand on block.


lululemon athleticaCC BY 2.0,
via Wikimedia Commons
14. Sleeping Turtle Pose (Supta Kurmasana – Advanced Forward Bend)

How to Do It:

  1. Sit with legs wide.

  2. Fold torso forward, threading arms under legs.

  3. Cross ankles behind head if flexible.

  4. Hold briefly, breathing deeply.

Benefits:

  • Deep stretch for hips, hamstrings, and spine.

  • Promotes introspection and calm.

  • Builds focus and patience.

Precautions:

  • Advanced pose—attempt only with guidance.

  • Avoid with knee, hip, or back injuries.

Conclusion

Forward bend yoga postures provide a unique blend of physical stretch, mental calm, and emotional grounding. By folding inward, we stretch the back body, soothe the nervous system, and encourage a deeper sense of introspection. From gentle poses like Child’s Pose to advanced asanas like Sleeping Turtle, there is a forward bend suitable for every practitioner.

The key to safe practice is patience. Forward bends are not about touching your toes but about creating length and relaxation. With props, modifications, and mindful awareness, these poses become accessible and deeply rewarding.

When integrated regularly into your yoga practice, forward bends help balance the energetic openness of backbends, creating harmony between effort and surrender. They remind us that sometimes growth comes not from striving outward but from folding inward—finding peace, balance, and resilience within ourselves.