Camel Pose (Ustrasana): Unlocking the Heart

Camel Pose (Ustrasana)
lululemon athleticaCC BY 2.0,
via Wikimedia Commons
INTRODUCTION

When you step onto your mat and prepare to open your body in new ways, Camel Pose (Ustrasana) invites you to bend deeply, breathe fully, and discover a sense of expansion you might not have thought possible. 

This heart-opening yoga pose stretches your body, strengthens your core, and awakens your energy. 

Practiced mindfully, it offers you not only physical release but also emotional openness and clarity.

In this essay, you’ll learn how to do Camel Pose, explore its physical and mental benefits, discover modifications, avoid common mistakes, and embrace the deeper symbolism behind this profound yoga backbend.

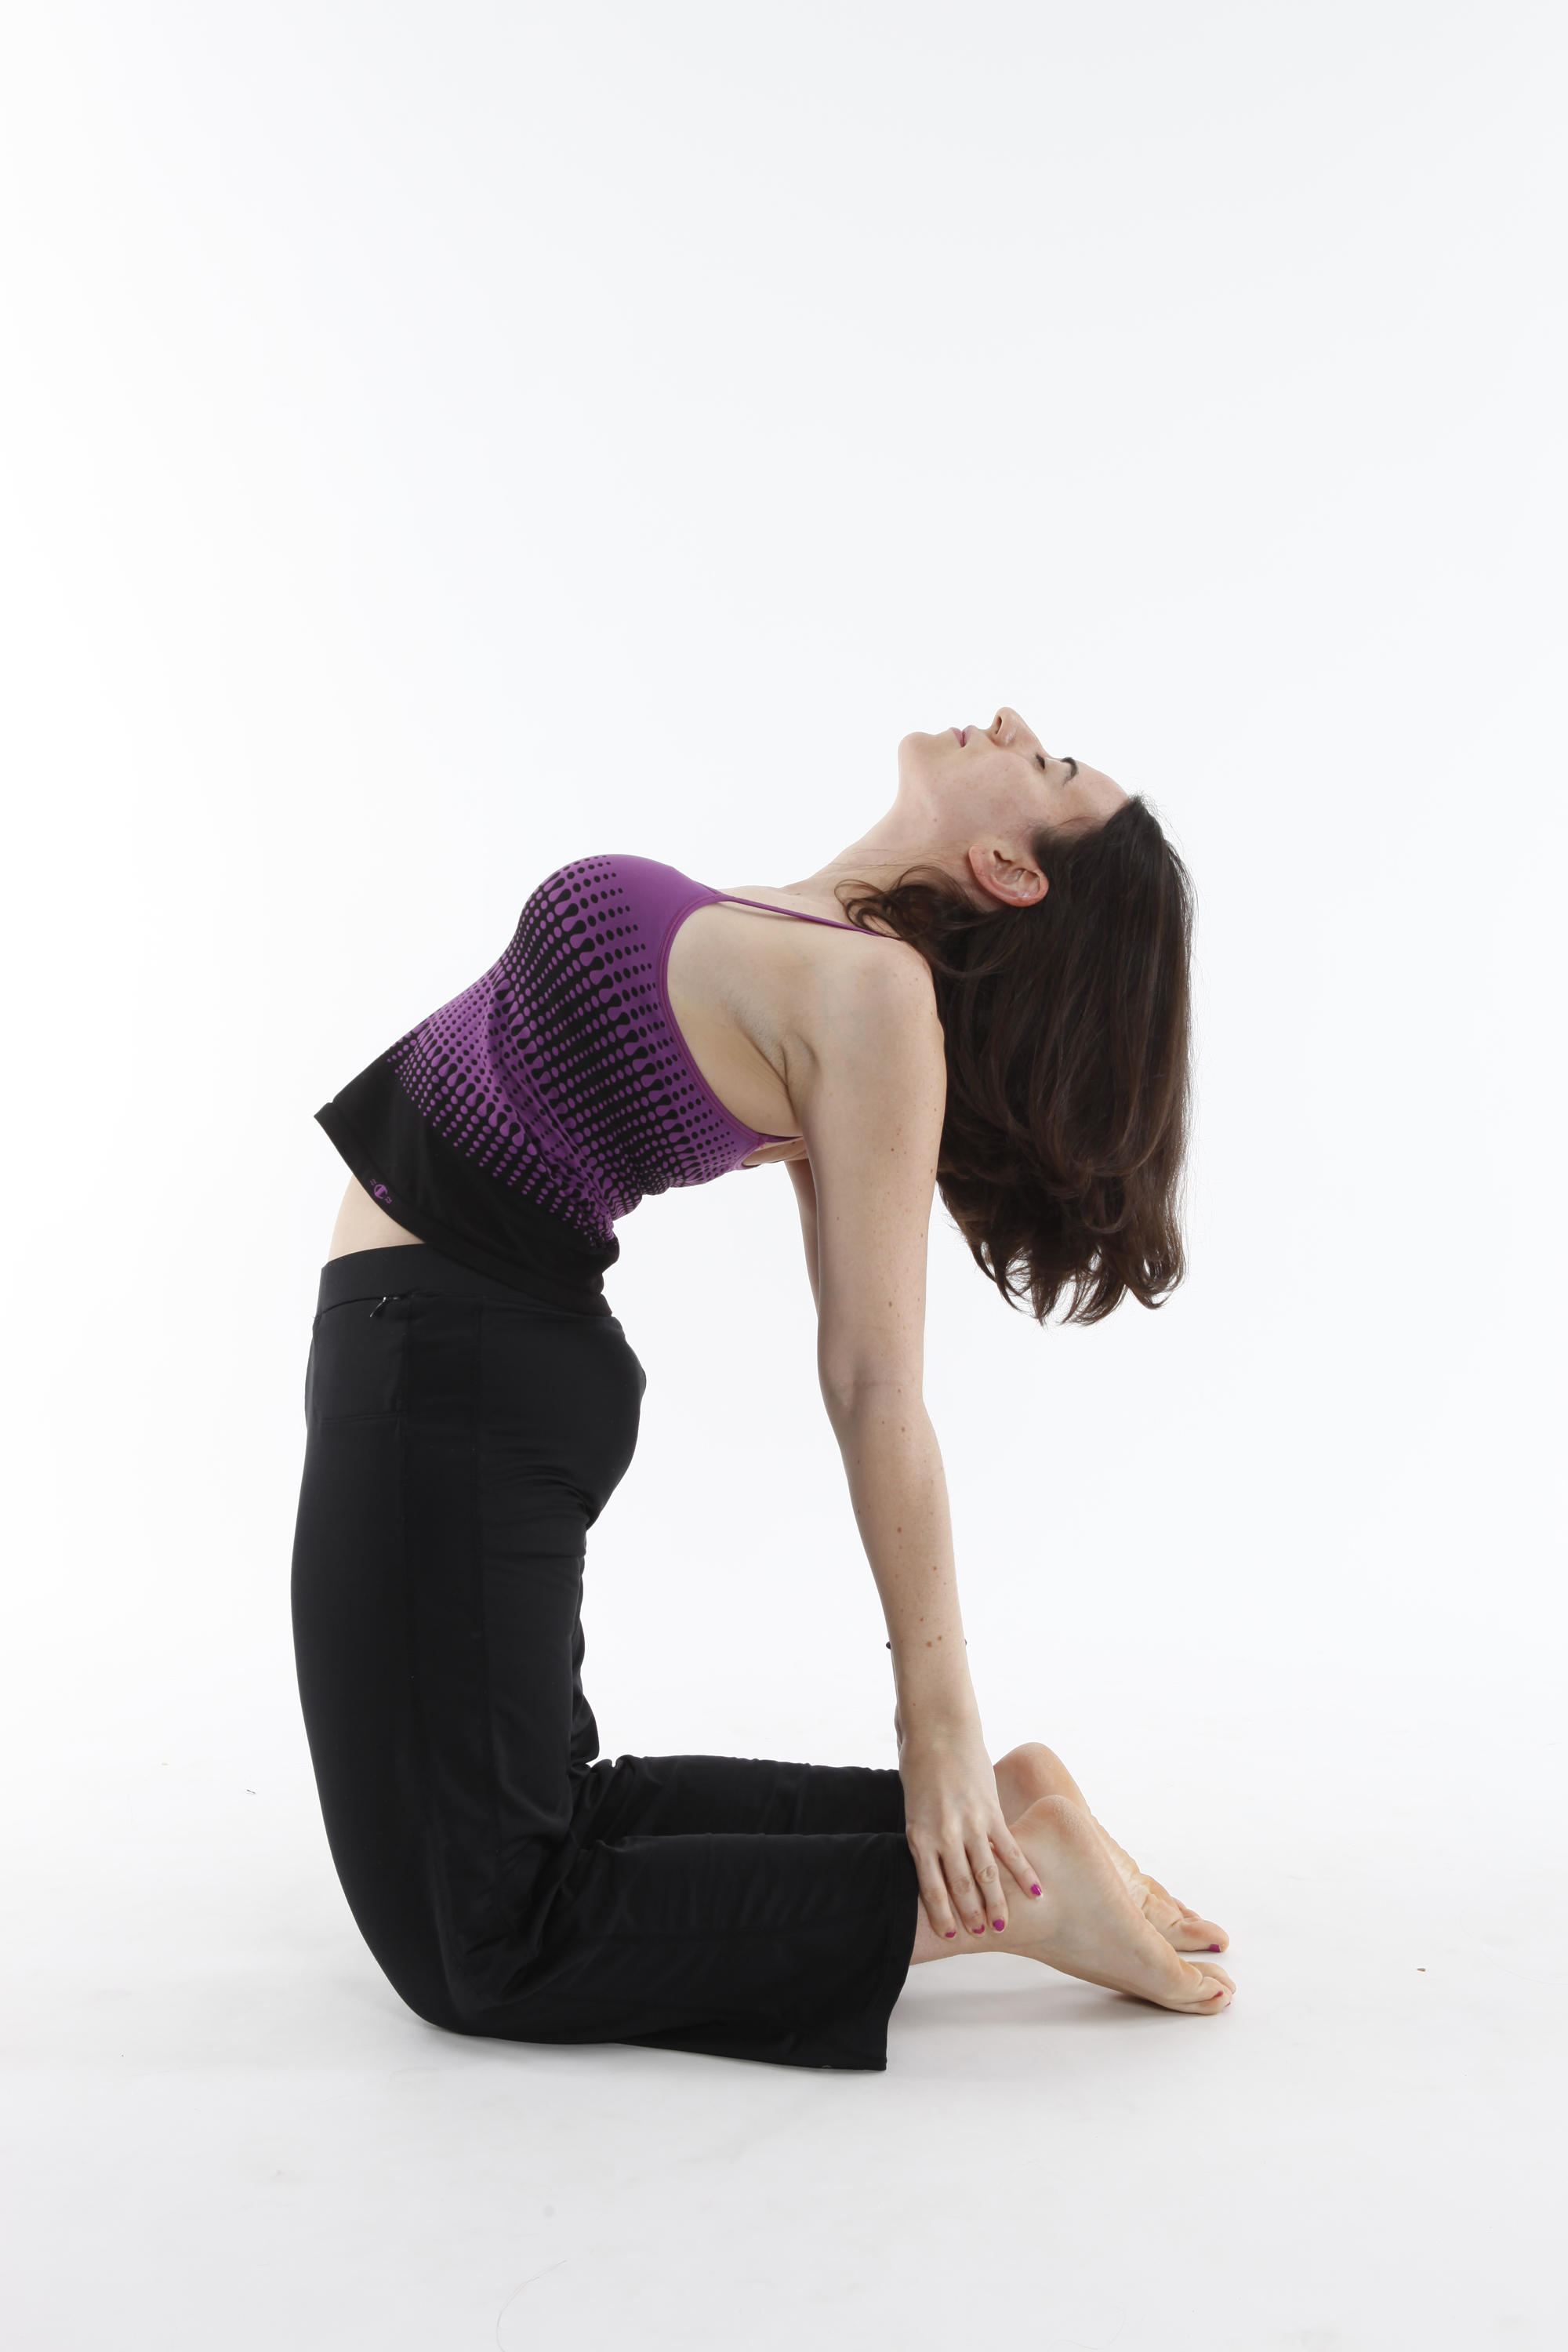
What Is Camel Pose (Ustrasana)?

The Sanskrit word Ustrasana comes from Ustra, meaning “camel,” and Asana, meaning “pose.” In this posture, your body forms an arch resembling the shape of a camel’s hump, with the chest lifted and the spine deeply extended.

When you practice this backbend yoga pose, you lean back on your knees, press your thighs forward, and extend your arms to reach your heels. The heart rises toward the sky, the shoulders roll open, and the throat gently stretches. This combination creates a powerful yoga posture for heart opening that challenges both strength and vulnerability.

Ustrasana - Camel Pose

Camel Pose (Ustrasana)

lululemon athletica
CC BY 2.0,
via Wikimedia Commons

Step-by-Step Guide: How to Do Camel Pose

  1. Begin in a Kneeling Position
    Place your knees hip-width apart on your yoga mat. Keep your thighs vertical and press the tops of your feet into the mat. Rest your hands on your hips as you prepare.

  2. Engage Your Core
    Draw your lower belly in and lengthen your spine upward. This engagement supports your back as you prepare to bend.

  3. Lift Through the Chest
    Inhale and raise your chest toward the ceiling. Imagine lifting your sternum as if it’s being pulled upward by a string.

  4. Initiate the Backbend
    Start to lean back, keeping your thighs pressing forward. Slide your hands down your hips toward your heels.

  5. Place Your Hands on Your Heels
    If your flexibility allows, reach your hands to your heels. If not, tuck your toes under to elevate your heels and make them easier to reach.

  6. Open the Heart and Throat
    Press your hips forward as you let your head drop back slightly, only as far as feels safe. Keep breathing smoothly.

  7. Hold the Pose
    Stay in Ustrasana (Camel Pose) for 20–40 seconds, breathing steadily. Feel the front body expand and the back muscles activate.

  8. Exit Safely
    To come out, bring your hands back to your hips, tuck your chin toward your chest, and slowly lift your torso upright. Rest in Child’s Pose (Balasana) to neutralize the spine.

Preparatory Poses for Camel Pose

Before entering Ustrasana, prepare your body with poses that warm the spine and open the hips:

  • Cat-Cow Stretch (Marjaryasana-Bitilasana): Mobilizes the spine.

  • Low Lunge (Anjaneyasana): Opens the hip flexors.

  • Bridge Pose (Setu Bandhasana): Strengthens the back body.

  • Cobra Pose (Bhujangasana): Prepares the chest for deeper backbends.

Counter Poses After Camel Pose

To balance the deep extension of the spine, follow Ustrasana with grounding postures:

  • Child’s Pose (Balasana): Releases tension.

  • Seated Forward Fold (Paschimottanasana): Lengthens the spine.

  • Easy Pose (Sukhasana): Encourages neutral relaxation.

Physical Benefits of Camel Pose

When you practice this yoga backbend for flexibility and posture, you nourish multiple systems in your body.

  1. Spinal Extension
    You stretch the chest, abdomen, and quadriceps while strengthening the back muscles.

  2. Improved Posture
    This pose counteracts slouching from sitting or device use.

  3. Enhanced Breathing Capacity
    By expanding the ribcage, you support deeper and more efficient breathing.

  4. Hip Flexor Release
    Pressing your thighs forward stretches muscles often tight from sitting.

  5. Digestive Stimulation
    The gentle abdominal extension boosts metabolism and digestive health.

Mental and Emotional Benefits of Ustrasana

Camel Pose is not only physical—it’s also a gateway to inner clarity.

  • Emotional Release: A heart-opening yoga pose that helps you let go of stored tension.

  • Boosted Confidence: Lifting your chest encourages empowerment.

  • Stress Relief: Smooth breathing calms the nervous system.

  • Mental Focus: Circulation improves, sharpening clarity and concentration.


Lilian White from Louvain-la-Neuve, BelgiqueCC BY 2.0,
via Wikimedia Commons

Variations and Modifications

You can adapt Camel Pose to fit your needs:

  • Hands on Lower Back: Great for beginners learning how to do Ustrasana safely.

  • Toes Tucked: Elevate your heels to make them easier to reach.

  • Wall Support: Press your thighs forward into a wall for alignment.

  • Half Camel Pose: Place one hand on a heel and the other on your hip, alternating sides.

Common Mistakes in Camel Pose

  • Collapsing the Lower Back: Always lift through the chest first.

  • Forcing the Neck: Keep your chin slightly tucked if dropping the head back feels unsafe.

  • Shoulder Tension: Roll them open rather than scrunching upward.

  • Leaning Back Without Support: Initiate from the heart, not the lower back.

Safety Precautions

When practicing Camel Pose for beginners or advanced yogis, keep these guidelines in mind:

  • Avoid if you have serious back, neck, or knee injuries.

  • Use props if your flexibility is limited.

  • Pregnant practitioners should skip deep backbends.

  • Warm up before attempting.

Symbolism and Deeper Meaning

Camel Pose is more than a stretch—it’s a yoga posture for emotional release and heart opening. When you bend back and lift your chest, you activate the heart chakra (Anahata), linked to love and compassion, and the throat chakra (Vishuddha), linked to communication and truth.

The pose teaches you trust and surrender. By opening your heart physically, you create space emotionally—for courage, forgiveness, and openness.

Integrating Camel Pose (Ustrasana) Into Your Practice

You can practice Ustrasana in many contexts:

  • As a Peak Pose: Build up with hip openers and gentle backbends.

  • Morning Practice: Use it to awaken your body and breath.

  • Stress Relief Routine: Counteract daily tension by opening the chest.

  • Restorative Flow: Pair it with grounding poses to balance energy.

Your Experience in Camel Pose

When you first practice Ustrasana, you might feel resistance—tight hips, tense shoulders, or fear of leaning back. With consistency, your body softens, your breath deepens, and your mind learns trust.

You discover that Camel Pose is not about forcing your body but about opening with courage. It reminds you that vulnerability and strength can coexist beautifully.

Conclusion

Camel Pose (Ustrasana) is a transformative backbend yoga pose that stretches your spine, opens your chest, and invites you to embrace both vulnerability and strength. It improves posture, enhances breathing, relieves stress, and connects you to deeper layers of self-awareness.

By practicing Camel Pose regularly, you learn the essence of yoga: the harmony of body, breath, and spirit. The next time you kneel, lift, and bend, remember that you are not only performing a posture—you are unlocking your heart, expanding your courage, and making space for compassion within yourself.

Rāja Grīvāsana: The Inverted Yoga Posture

Rāja Grīvāsana
Thamizhpparithi MaariCC BY-SA 3.0, via Wikimedia Commons
Introduction

Yoga has always been considered one of the most complete systems for harmonizing body, mind, and spirit. 

Among the many postures in yoga, inverted poses hold a unique place because they literally turn our perspective upside down. 

One such posture is Rāja Grīvāsana, also called the “Headstand Preparation” or “Inverted Neck Posture.” In some traditions, this pose is seen as a preparatory step for Śīrṣāsana (the classical headstand), while in others it is treated as an independent and beneficial posture in its own right.

The word Rāja means “king” or “royal,” and Grīva refers to the “neck.” The name suggests that this is a royal or elevated practice involving the neck and head region. Because the pose involves balancing on the head with support from the forearms, it requires awareness, control, and careful alignment.

Although it may look advanced to beginners, many practitioners describe Rāja Grīvāsana as one of the easier inverted positions, provided it is learned under guidance and performed mindfully. Like all yoga postures, it is not just about physical balance but also about cultivating inner steadiness, patience, and focus.

A Word of Caution

Before attempting Rāja Grīvāsana, it is important to recognize that inversion postures demand respect. For most people, this pose can be performed safely, but there are exceptions. Pregnant women should avoid it unless a qualified yoga teacher gives specific approval and modifications. People with neck injuries, high blood pressure, glaucoma, heart conditions, or recent surgeries should also consult a healthcare professional before practicing.

Yoga is not a competition, and every body is different. Progressing step by step, listening to your own limits, and respecting your comfort level is far more important than achieving the “perfect” shape.

Step-by-Step Guide to Practicing Rāja Grīvāsana

Rāja Grīvāsana
Thamizhpparithi MaariCC BY-SA 3.0, via Wikimedia Commons

To experience the benefits of this posture, follow these steps carefully. Beginners are encouraged to practice near a wall until balance and confidence are developed.

  1. Begin in a Kneeling Position

    • Come onto your knees on the yoga mat. Keep the spine comfortably upright and take a few slow breaths. 

    • This moment of centering prepares the body and mind for the inversion.

  2. Place the Forearms on the Floor

    • Slowly bend forward and bring both forearms down to the mat. Ensure the elbows are shoulder-width apart.

    • Interlace the fingers, forming a cup or cradle with the hands. This creates a strong triangular base that will support the head and neck.

  3. Position the Head

    • Place the crown of your head gently onto the mat, with the back of the head resting against the interlaced fingers. The forearms and hands act as stabilizers, preventing excessive pressure on the neck.

  4. Lift the Hips

    • Tuck the toes under and slowly straighten the knees, raising the hips toward the ceiling.

    • Walk the feet closer toward the head, allowing the hips to align over the shoulders. At this stage, your body naturally forms a triangular shape with the floor—forearms and head as the base and legs extended toward the ceiling.

  5. Finding Stability

    • Do not rush to lift both legs off the ground. For beginners, simply staying in this inverted triangle position with feet still touching the floor is already highly beneficial.

    • With practice, you may gently shift more weight onto the forearms and lift one foot at a time, eventually balancing with both legs raised vertically.

  6. Holding the Posture

    • Stay in the position for as long as feels comfortable, breathing calmly and steadily. Some practitioners hold it for 10–20 seconds initially, gradually increasing to one or two minutes.

    • Focus the mind on balance, breath, and the subtle sensations of inversion.

  7. Exiting the Pose

    • To release, slowly bring the feet back down to the mat. Rest in Child’s Pose (Balāsana) for several breaths. This counter-pose allows blood flow to normalize and prevents dizziness.

Rāja Grīvāsana
Thamizhpparithi MaariCC BY-SA 3.0, via Wikimedia Commons

Benefits of Rāja Grīvāsana

Like other inversions, Rāja Grīvāsana offers a wide range of benefits for physical health, mental clarity, and energetic balance.

  1. Improves Circulation to the Brain

    • By reversing the usual direction of gravity, fresh oxygenated blood flows toward the head. This nourishes brain cells, sharpens concentration, and supports memory and mental alertness.

  2. Strengthens the Spine and Core

    • Holding the inverted triangle engages the back muscles, abdomen, and shoulders. Over time, it builds strength and stability in these areas, improving posture in daily life.

  3. Relieves Muscular Tension

    • Practicing this pose can reduce stiffness in the back, legs, and thighs. People with sedentary lifestyles often report relief from lower-back discomfort after regular practice.

  4. Support for Sciatica Sufferers

    • Under expert supervision, the pose may help relieve the pain of sciatica by stretching and releasing pressure in the lower spine and legs. However, this must be done with care and guidance.

  5. Boosts Nervous System and Confidence

    • Inversions stimulate the parasympathetic nervous system, creating a calming yet energizing effect. They also challenge balance and courage, fostering self-confidence and inner resilience.

  6. Gives a New Perspective

    • Flipping the body upside down changes the flow of energy and the way we perceive ourselves. Many practitioners describe feeling refreshed, rejuvenated, and even spiritually uplifted after holding the pose.

Common Mistakes and How to Avoid Them

  • Collapsing the Neck: The head should not carry the entire body weight. The forearms must press firmly into the ground to share the load.

  • Rushing to Balance: Trying to lift both legs too quickly can cause strain or falls. Work gradually and practice near a wall if needed.

  • Holding the Breath: Breathing steadily is essential. Breath retention creates unnecessary tension.

  • Overstaying in the Pose: Beginners should not attempt long holds. Increase duration slowly with regular practice.

Philosophical and Energetic Significance

In yoga philosophy, inverted postures are seen as a way of turning the world upside down—literally and symbolically. They encourage practitioners to see life from a different angle, breaking habitual patterns of thought.

From the perspective of energy flow (prāṇa), inversions help redirect circulation toward higher chakras, particularly the throat (Viśuddha) and crown (Sahasrāra). This is said to awaken spiritual awareness and connect practitioners to a sense of clarity and inner peace.

Rāja Grīvāsana
Thamizhpparithi MaariCC BY-SA 3.0, via Wikimedia Commons

Integrating Rāja Grīvāsana into Your Practice

For best results, Rāja Grīvāsana should be practiced after warming up with preparatory postures such as Downward Facing Dog (Adho Mukha Śvānāsana)Dolphin Pose (Ardha Pincha Mayūrāsana), or gentle shoulder stretches. 

It can be followed by restorative counter-poses like Child’s Pose or Corpse Pose (Śavāsana) to balance the body.

Practicing consistently, even for short periods, is more beneficial than pushing too hard on a single day. Approach the posture with patience and curiosity, and over time it becomes a steady, enjoyable part of one’s yoga journey.

Conclusion

Rāja Grīvāsana, whether practiced as preparation for Śīrṣāsana or as an independent pose, is a gateway into the transformative world of inversions. It teaches balance, strengthens the body, refreshes the mind, and offers a new perspective on life. With mindful attention and proper guidance, it can be a deeply rewarding practice for both beginners and seasoned yogis.

By turning ourselves upside down, we not only invigorate our physical systems but also invite a subtle shift in consciousness. We learn that sometimes, the best way to see clearly is to look from a completely different angle.