
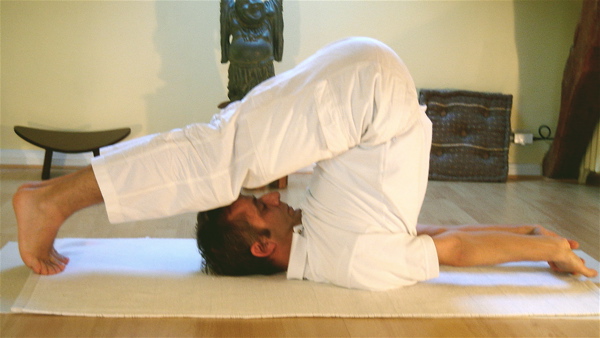
SARVANGASANA
Joseph RENGER, CC BY-SA 3.0,
via Wikimedia Commons
Here are some yoga postures doing which we have to invert our body, bending backside.
Joseph RENGER, CC BY-SA 3.0,
via Wikimedia Commons
Preparation: Bridge Pose, Viparita Karani, Halasana
Known as the “Queen of Asanas”
Stimulates the thyroid and parathyroid glands
Improves blood circulation
Calms the brain and reduces insomnia
Enhances immune system function
This inversion is deeply rejuvenating when done with care and appropriate support under the shoulders to protect the neck.
How to Do Shoulder Stand Pose
- First of all lie on your yoga mat: Keep the back flat on the floor. Both the palms should be resting downwards. Start inhaling, slowly.
- Now start it. Bend both the knees and draw them nearer to your stomach. You should keep inhaling slowly until the knees reach up to the stomach. Here you would exhale.
- Start inhaling again. Now you are to put all the pressure on the hands and try lifting your whole torso from the waist. It would make your spine into the shape of an ark.
- After the back is considerably up, exhaling and try raising both of your legs upward. Finally, you would keep your legs straight. Now the weight of your whole body would be on your shoulders.
- For coming into normal position, you are to do all the actions in their reverse order. Finally, your body would be in Shavasana, the relaxation Pose.
SARVANGASANA
Joseph RENGER, CC BY-SA 3.0,
via Wikimedia Commons
Joseph RENGER, CC BY-SA 3.0,
via Wikimedia Commons
Benefits of Doing Shoulder Stand Pose
- The Sarvangasana benefits our body and mind in several ways. It increases the flow of blood to the upper parts of our body. Such an increased flow of blood would help in increasing memory power.
- Doing this pose regularly can provide health solutions in the cases of soaring of the throat and nasal congestion.
- While doing this pose you would notice that your back get adequate exercise. It helps in reducing back pain.
- If you feel uneasy by sleeping much, you will feel relieved after doing Shoulder Stand posture.
- Above all this asana involves almost every limb of the body, as its name suggests, it helps to keep our body healthy and fit.
The sarvanga-asana benefits our body and mind in several ways. It increases the flow of blood to the upper parts of our body that helps to heal many disorders. We can have beneficial effects of the problem in soaring of the throat and nasal congestion. It helps in back pain.
If you feel uneasy by sleeping much, you would feel relieved after doing this asana. Above all this asana involves almost every limb of the body, as its name suggests, it keeps body healthy and fit. Regular practice would help in the long run.
For beginners, this posture would be a little bit difficult. But you would like to do it, as you can do another difficult posture of 'Halasana, the Plow Posture' from the shoulder Stand pose.
Caution: The beginners should avoid remaining for more than ten seconds in this pose. It may cause minor pain in your neck.
 |
| Joseph RENGER, CC BY-SA 3.0, via Wikimedia Commons |
Stretches the spine and shoulders
Massages abdominal organs
Reduces stress and fatigue
Improves flexibility of the back and neck
Soothes the nervous system
Halasana deepens the experience of inversion and encourages surrender and internalization.
- First of all, you should lie on your yoga net. You should keep a rolled towel or a small pillow under your neck. It supports and protects the muscles of your neck.
- Keep the back flat on floor and palms should be rested downwards. Start inhaling, slowly.
- Now start bending both the knees and draw them towards your stomach and keep exhaling.
- While exhaling try raising both of your legs upward. Support your hips with your hands. The chin should be touching your chest. Finally, the torso should be straight and your paws facing the ceiling. This posture is called ‘Sarvanga Asana' or Shoulder Stand Pose. This is also called Whole Body Posture.
- Now proceed on. Put your hands flat on the floor. Palms should be facing the floor.
- Start bending your hips slowly so as your feet go in the opposite direction of your head. Let the feet go until your toes touch the yoga mat. Finally, your body would be in Plough Posture.
- For coming into normal position, you are to do all the actions in their reverse order.
Plough pose is one of the three poses, which are recommended to activate the ‘Manipur Chakra’ of Kundalini. This is the third chakra of Kundalini, and it is above our belly button. For doing that, you are to do three poses in the sequence. First, you should do the ‘Shoulder Stand Posture’. From that posture, you can proceed to do the ‘Plough Pose’, as it is one step ahead from the same. Finally, your body would rest in Savasana or Shavasanan’, which is also called ‘Relaxation Pose’.
Benefits of Doing Plough Pose
- This pose helps us stretching all the muscles from toes to waist. So it improves the functioning of our veins.
- While doing this pose, our spine is fully stretched. It makes the spine more elastic. The overall function of the spine is improved by doing this pose regularly.
- If a person is facing indigestion or any other gastric problems, practising of Halasana would help him or her to a great extent.
- Pregnant women should do this pose after getting proper guidance from their yoga teachers.
 |
| Joseph RENGER, CC BY-SA 3.0, via Wikimedia Commons |
If the whole body of yours is supported on your forearms; if your head is touching the floor; and your feet are facing straight to the sky; you must be in the state of ‘Sirsasana’, or ‘Headstand Yoga Posture’.
As this posture makes us stand on the strength of our head, it is named Headstand Posture. Sanskrit word for it is Shirshasna, but it is pronounced as ‘Sirsasana’ or ‘Sirshasana’, too.
While being on mere support of the head, we can take the assisting support of our palms or ankles as shown in these two illustrated postures.
As this posture makes us stand on the strength of our head it is named as Sirshasana, the Head Stand Posture. While being on mere support of the head, we can take the assisting support of our palms or ankles as shown in these two illustrated postures.
How to Do Shirshasana
Known as the “King of Asanas”
Enhances mental clarity and focus
Builds upper body and core strength
Improves circulation to the brain
Strengthens spine and arms
Promotes emotional stability and self-awareness
Sirsasana demands careful alignment and consistent practice. It should be taught under experienced guidance due to the risk to the cervical spine if done incorrectly.
Here is step-by-step guidance for doing this pose. It is one of the most difficult postures. But it can be done in two stages.
Stage One
|
| Joseph RENGER, CC BY-SA 3.0, via Wikimedia Commons |
- Come to kneeling position and put your forearms fully touching the floor. The fingers are to keep interlaced.
- Put your head on the area cupped by your fingers and the forearms.
- Then raise your waist as straight as possible. You can do it by taking your feet closer to head. It will send your hips over your shoulder. In this position, your body would make the shape of a triangle on the floor. This posture is an independent yoga posture. It is called Raja Grivasana. You can stay in this pose as long as you like.
Stage Two
- After you feel comfortable in Raja Gricasana, the last pose, as shown above, you would try lifting your feet and dragging knees near to your chest.
- Let the feet be settled for a while.
- The slowly and steadily try raising legs up. You should not worry if you fail to do it for one or two days.
- After the legs are straight and upward, the ‘Headstand Posture’ is completed. You are to remain in this pose for ten seconds.
- When you decide to end the pose, first put your one of the legs on the floor and then another.
Benefits of Doing Sirsasana
Like all other postures, it increases the flow of blood to our head and brain. This in turn would result in improvement of intellectual functions. It would help in increasing our memory.
It would help us to get relief from back pain or pain in leg and thigh muscles.
This small piece of writing will be helpful to the younger generation.
ReplyDelete