 |
Joseph RENGER, CC BY-SA 3.0, via Wikimedia Commons |
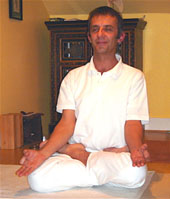
Padmasana, Lotus Pose
We can see from all the paintings and idols of Buddha that this posture was his favourite. He is always depicted as sitting in Padmasana.
Moreover, it is the most favourite posture among all of those practice yoga postures.
Sitting Alignment in Yoga: Asana is a Sanskrit word meaning to keep our body in a particular posture.
The great Yogi Patanjali had devised many asanas, the postures, which were steady and comfortable.
His teaching is known as Ashtanga Yoga, too.
Most of the postures are practised to achieve better physical and mental health, as these yoga postures have a deep impact on our body, mind and soul. The meaning of ‘Padma’, a Sanskrit word, is the lotus. While sitting in this posture, the human body looks like a lotus.
Thus it is named ‘Padma Asana’. Padmasana is a basic posture for many yogic acts. If you want to do chanting for longer hours it is convenient to sit in this asana. As narrated by Patanjali, sitting in this posture makes the energy of the human body takes its natural shape, helping to heal several disorders in the body. It is believed that those who practice Padmasana would get help in awaking Kundalini.
BENEFITS OF DOING PADMASANA.
Padmasana is a basic posture for many yogic acts. If you want to do chanting for longer hours it is convenient to sit in this pose. As narrated by Patanjali, sitting in this posture makes the energy of the human body taking its natural shape. It helps in healing several disorders in our body. It is believed that those who practice Padmasana would get help in awaking Kundalini.
All the yogis and their pupils prefer to be in this posture while doing the various breathing exercises.
HOW TO DO PADMASANA
· You just sit on the floor or on yoga net, spreading your legs in forwarding position.
· Arrange your left foot on the right thigh and the right on your left thigh.
· Keep the upper half of body straight and put left hand on left knee and right on the right knee. The palms should be facing upward.
· Then keep the tips of both the thumbs just touching your index fingers.
· Sit in this posture as long as you can. There is no harm in sitting until you feel it uncomfortable.
YOGA POSTURES: Vajra-asana, Thunderbolt Pose
THEME: Learn doing Yoga Exercises, How to do Different Postures of Yoga. Learn about Yoga Asanas.
 |
Joseph RENGER, CC BY-SA 3.0, via Wikimedia Commons |
Vajrasana, The Thunderbolt Yoga Posture
BENEFITS OF VAJRA ASANA: It has been noticed that regular practise of this asana increases the secretion from the glands, which are vital for the physical and mental health of a person.
Along with other benefits of doing Yogic posture, Vajrasana helps the digestion process and assists in eliminating the gastric troubles. Those who have suffered from the pain in the knee would be benefited by doing this posture.
One who practices this asana regularly does not suffer from fever, constipation, indigestion and other minor or major ailments. Your mind would also get stabilized in this asana. It is very useful while doing meditation, as it helps you becoming concentrated, focussed.
- First of all, sit on the floor by extending your legs forward and putting the palms resting.
- Then bend your one leg from the knee and put it just below the buttock. Repeat the same act for another leg, in a way that the things rest on the legs and the buttocks on the heels.
- Keep the breathing at normal speed. Even if you do not try keeping the breath normally, it will catch its normal speed naturally!
- Put both the hands resting on thighs and sit erect. You might feel some pain in ankles, knees or toes; but gradually it will be set right.
- Sit in this posture as long as you can.
YOGA POSTURES: Paschimottanasana, and Uttanasana
 |
Joseph RENGER, CC BY-SA 3.0, via Wikimedia Commons |
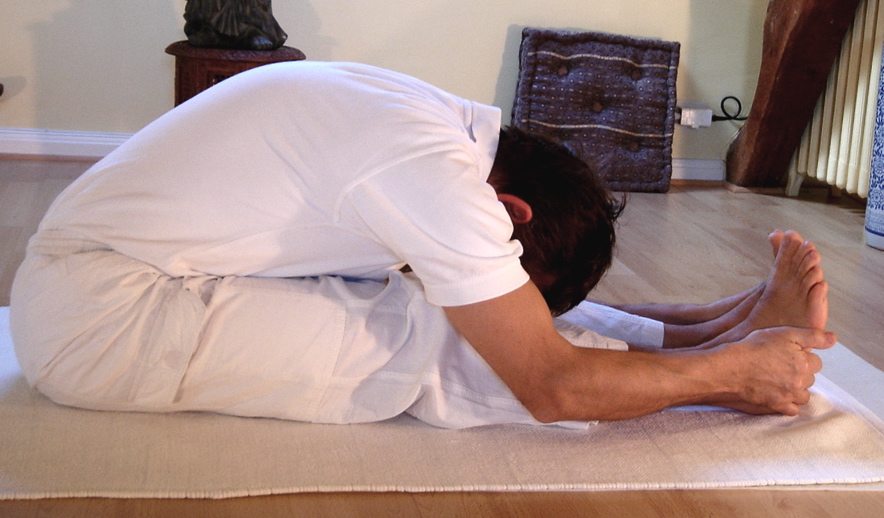
Sanskrit word ‘Paschimottanasana’ is made of three words: ‘Paschim’, ‘tana’ and ‘Asana’. Meaning of ‘Paschima’ is ‘posterior’ and ‘tana’ means a stretch.
This pose is named so because while doing it we stretch our back or the posterior part of the body.
How to Do Paschimottanasana
- First of all, you are to sit on your Yoga Net or on the floor.
- Then stretch your legs forward on the floor and arrange your torso and head in the straight line upward.
- The pelvis should make the right angle to the legs.
- Once your legs are stretched fully, hold your big toes with index fingers. You should make hooks of your fingers.
- If you feel pain in doing so you can lift your legs upward and then catch the hold of the toes as shown above. Then slowly try to push your legs downward so as they fully touch yoga mat.
- Alternatively, you can keep your palms holding your whole paws.
- After the toes are in your fingers, try bending your hip forward, slowly and not causing any pain. If you feel pain have some rest and try it later. No yoga teacher would insist that you should do any over-stretching of any muscle.
- Finally, get your trunk parallel to your legs. This will make your body looking folded from your back.
- It would be better if your head is touching your knees.
- You can remain in this posture as long as you can. But avoid remaining for long in the beginning.
Benefits of Doing Paschimottanasana
- This posture is relatively easy to do. By taking a little care about your back muscle, you can do it without much trouble.
- This is one type of forwarding bend postures of yoga. It would provide a comprehensive exercise to the abdominal and pelvic muscles.
- It also stretches the kidney and upper side of the back.
- You can feel very much relaxed after doing this asana, as it would provide good exercise to you back and leg muscles.
- The muscles of hands would also get a good stretch.
- Those who complain about having pain in their back, they can feel better after doing this pose regularly for one week.
- Yoga teachers advised this pose to those who want to shed their extra pounds of fat.
- After doing Paschimottanasana for two weeks you might find your tummy lighter and the belly proceeding inside.
- Those persons who are having larger belly should do this posture after consulting a physician. Preferably they should do this pose in the presence of a trained teacher.
Yoga is a natural healer. It provides curative solutions for hip joints pain, back pain and abdominal disorders. Regular practice of meditation and yoga poses would make us feel healthy and younger.
 |
The original uploader was Nemonoman at English Wikipedia., GPL, via Wikimedia Commons |
Theme Yoga Postures for Fitness and total Well-being.
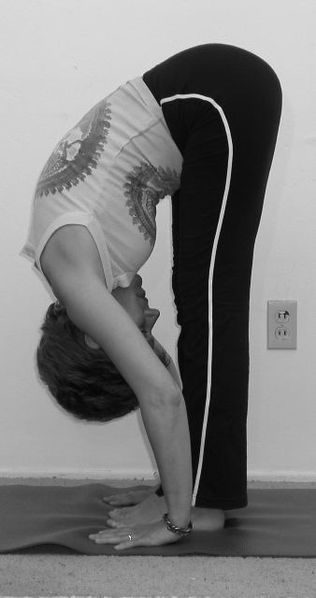
The forward bend yoga postures help stretching the limbs that we might not be stretching in general work. The Uttanasana would provide good exercises to our calves, hips and the hamstrings.
Before doing this posture you may do Paschimottanasana. It would help you to prepare your thighs and leg muscles to be ready for a standing forward bend posture. After doing this posture, you should do the Shavasana, Corpse Pose the relaxing pose.
How to Do Uttanasana
-- After positioning your body in Tadasana, the straight standing pose, put your hands on the hips. While you exhale bend your torso forward. While bending, the aim should be to get your torso more and more bent forward.
--You can let your forehead touching the knees or your legs, or just in swinging position.
--Keep the palms flat on the ground or on your yoga net. You can remain in this position for 30 seconds to one minute. The beginners should not give more stress to any limb by stretching it for a longer period.
Benefits of Doing Uttanasana
In addition to the general benefits of doing Yoga Postures, the Forward Bending Pose, Uttanasana would provide other benefits to those who practice it regularly.
· The first and important advantage of doing this posture is that it would strengthen our thighs and knees.
· As it provides good exercises to the intestines, too, it would help our digestion process positively.
If you feel stressed after working during the day, this asana would help to reduce your stress. As the head is going downward in this posture, the blood supply in the head would be sufficiently increased.
This posture can be done with some variations, too. Instead of putting the palms flat on the floor or on the Yoga mat, we can keep it near the ankles, too. Generally, the palms are kept around the ankles as if we have caught hold of the ankles with the hands.
In any of these variations, this yoga pose would work as a stress-reducing activity. The element of fatigue and anxiety is considerably reduced after doing this posture.
It is also observed that those who are suffering from the difficulties of insomnia have been benefited by doing this posture.
 |
Robin Lambrecht Ich habe alle Bildrechte von Herrn Lambrecht erworben., CC BY-SA 4.0, via Wikimedia Commons |
You are to lie down on your yoga mat, flat on your back. Thereafter try t lift the entire spinal cord.
Ensure that the hips and the backside of the head remain touching the ground. This would result in a body posture known as Fish Pose of Matyasana.
This pose helps in opening the abdomen muscles. As you can see from the image, the hip part of our body is touching the ground, but the entire portion of the spinal cord is fully lifted upward. It helps in reducing the mid-back spinal pain, too.
The pectoral muscles are stretched in full while we do the fish pose. This would provide good exercises to the neck, breasts, and the chest.
Dwapada Urdhwa Ardh Matyasana
This asana can be done with one variation. After positioning the whole body as shown above, you should lift your legs upward. Keep both the legs straight and the paws straight in the direction of the wall, and not to the sky. As our body is required to use both the legs and keep it upward, this pose is named as Dwapada (two legs) Urdhwa (Up) Ardh Matsyasana.
Precautions
While doing this posture, or postures similar to this one, a yoga exercise doer should keep some important factors in mind. These factors are relating to health. If you are suffering from low pressure or high pressure of blood, you should take doctor’s advice before doing such poses. In any other physical difficulties, it should be done in the presence and guidance of a trained yoga teacher.
This postures can be done in half also. It is called Ardh-Matsyasana

Joseph RENGER, CC BY-SA 3.0,
via Wikimedia Commons
Yoga postures
Ardha-matsyendrasana
Theme: Learn doing Yoga Exercises, How to do Yoga Postures
Joseph RENGER, CC BY-SA 3.0,
via Wikimedia Commons
Yoga postures
Ardha-matsyendrasana
This asana was devised by a Yogi whose name was Matsyendra. So the Yoga Posture is named after him. But the Purn Matsyendra is difficult for the beginners to do easily. Thus the Half Spinal Twist Posture is devised. It is called the Ardh Matsyendrasana.
How to Do Half Spinal Twist Posture
- It is one of the easiest poses; it involves the movements of only hands and legs.
- After putting your yoga net, sit in kneeling position. You shout be sitting on your feet and both the heels should be pointing outward. You can sit in Thunderbolt Pose (Vajrasana), too.
- Now put your right hand on the mat and lift the left leg putting it over right leg with the help of left hand. Here the foot should be placed outside of the right knee.
- Keep your spine in a straight posture, placing right side heel touching the buttocks.
- Now feel free and widen your both the hands so that they become straight at the level of your shoulders. Thereafter twist both the hands leftward. Here keep in mind that there you should not feel pain in your back muscle. If you feel so, tell your yoga teacher about it.
- Finally, you are to take hold of your right foot with your left hand and twist the whole torso rightward. The right hand would be on the floor on the right side of your body. Here the Half spinal Twist Pose is complete. You can repeat the same pose by changing the side. In that case, you would start by putting your left foot on the right side. This would provide exercise to the whole body in general and to the spinal cord in particular.

lululemon athletica, CC BY 2.0,
ia Wikimedia Commons
Ardha Matyendrasana -
Half Lord of the Fishes Pose -
Bound Arm Variation
Benefits of Doing Half Spinal Twist Posture
lululemon athletica, CC BY 2.0,
ia Wikimedia Commons
Ardha Matyendrasana -
Half Lord of the Fishes Pose -
Bound Arm Variation
Benefits of Doing Half Spinal Twist Posture
|
lululemon athletica, CC BY 2.0, ia Wikimedia Commons Ardha Matyendrasana - Half Lord of the Fishes Pose - Bound Arm Variation |
· Regular practise of this asana increases the flexibility of our spine.
· Shoulders and chest would see a noticeable expansion after a time.
· If you have some spinal tension in mid-back, you would be benefitted.
· By doing Final Twist Pose, the abdominal muscles and all the whole structure of bones in the hip area are involved and they get the benefit.
· In general, this asana stimulates the digestive fire.
Those who are practising yoga since few days would also find that this yoga posture of the exercise is only easy to do but it would help to stimulate the interest into the yoga asana.
It is like massaging the internal organs of our body. Practising the yoga postures regularly, you would be keeping those parts of body activating which are not used in ordinary activities of your life.
ALWAYS FEEL FREE TO COMMENT. I value your views.
ReplyDelete